Who are these strange fellows?

My photo
Manbench Industries; Purveyors of general mayhem since 1994, a blog to follow the crazed, possibly deranged projects and emotive musings, of an undergraduate engineer, and an apprentice organ builder who have always felt they were born in the wrong age. Follow us as we, re-write history, learn lost skills, discover strange new worlds, break things, rant at things, mend things, make new things and generally find ways of passing the day instead of doing "proper work" !

Wednesday, 30 January 2013

You Call That An Awning?!?!?! This Is An Awning!!!

While we here at MBI like to think we're pretty good at building things, sometimes, we just have to concede defeat, and realise that we will never be able to build an awning as truley spectacular as this guy's. 

We spotted this a few years ago at the Dorset Steam Fair, and its about time we payed homage to the masterful structural skills this guy possesses!


The Carpenter. 

Show us ya' NOB!

This is a KOolis little-bit-o-work,...
The knob to control the tension on the dampener I've made for the Hawkes snare drum. Made from a bit of bought in turned, pine drawer handle (From a large quantity we'd purchased to make pipe stoppers with,) and an old BA nut.

I simply marked out the center, drilled it, then marked out a housing for the nut and chiseled it out, (and it being into the end grain of a bit of pine) I thought this was quite skillfully done! The nut was then pressed into a tight fit with a little epoxy resin to help it on its way.

The end result plus a good few coats of shellac, proved very pleasing, and when fitted to the drum could easily fool someone into thinking its an original feature.

False antiquing lesson 101!
If it needs to look old, leave some dirt and grubby marks in place under your varnish, shellac or laquer. For that authentic restored look, who need to know its brand new? Our little secret...


The Carpenter.

Monday, 28 January 2013

Steam Cannon

You know when a project gets a little out of hand...well, if you don't, we do! This is one of them. I first saw the idea for this on the fantastic TV series, Mythbusters, where they tried to prove Hero was able to produce  a steam cannon in the ancient world. In the end, it was shown to probably not be possible with technology available at the time.

However, that didn't stop me from wanting to have a go at modelling it in a small scale. I started off with various bits of copper pipe, and a couple of bits of Mahogany rescued from the fire! I started making a quick action ball valve, but then found the one seen in the photo at a car-boot sale, so used that instead. The columns for the barrel support came from a brass candle holder that was in the brass bits box. I figured square nuts would look best on something of this age, so made all the nuts out of some brass square stock - I think they look rather smart.

Various detailing parts have been made, such as a ram rod and a set of bollards on which to tie the lifting string when in use. The current addition being worked on is an inclinometer which will be used to measure the angle of inclination of the barrel. I quite fancy making up a set of firing tables after experimentation with firing, with the tables giving the required degree of inclination and firing pressure needed to land the projectile on a particular spot. Apologies for the dust - I have little time for cleaning!


The Engineer.

Saturday, 26 January 2013

Splitting headache!! (Life lessons No. 2)

Time for another Life Lesson kids!

When taking the time to do a job properly, dont rush the end to get it out of the way...

I ended up making a second bearing block for a drum dampener after rushing, and using undersized pilot holes. As we can all see, (and duly laugh at my foolishness) I consequently split the block in two.

Ultimately this ends up taking twice as much time, so remember kids, do as I say not as I do, and take your time. MBI motto; If a jobs worth doing its worth overdoing.


The (Royally pissed off at his own haste) Carpenter

Thursday, 24 January 2013

y0U AiNt g0t tH3 bAl1S M8t...

If theres one thing everybody needs, its a ball measuring device....

A device for measuring the diameter of spheres to a reasonable degree of accuracy, not much more to say really, I made this one for a school physics experiment, and its shown here with a charming man  inside for lack of a sphere in the local vicinity. (Note how I cunningly avoided saying 'lack of balls'!)


2 bits of acrylic, some steel rod, a broken rule, and 2 minutes on a pillar drill, and you can have your very own!

The Carpenter. 

See No Boredom Fear No Boredom!

Its a trusted Manbench Industries motto that "Shit happens, get on with it" so after suffering a major eye injury and losing most of the sight in one eye a few years ago, I made sure productivity was still maintained in some way....

Being somewhat limited for a few months by doctors orders of what head movements were allowed, projects were forced in the most part to being kit built models, still they kept me sane through a pretty crappy time and come the end I was actually pretty pleased with the result, here is some of what I produced during that time.


The Carpenter.

Tuesday, 22 January 2013

Waterwheel Display

A trip back a few years now, this was built as my GCSE Product Design project. At the start of my GCSEs I chose to do Art as one of my options for some reason that I've yet to be able to understand, anyway, it didn't take me long to come to the conclusion that I'd rather have another set of lessons in a proper workshop (I was already doing Systems and Control) as opposed to drawing fruit!

Anyway, this was my product for the final project, the brief I was given was something about an interactive exhibit for a science museum, so I built this set of water wheels. It shows clearly the operation of the overshot, undershot and breastshot water wheels. The clear tank sides were all laser cut - my first use of CAD/CAM in anything I had made, but the rest of the acrylic components were all cut by hand, with the edges the finished to smooth by hand - not fun. The pump used is a windscreen wiper pump and sits in a tank under the wheels, pumping water through a series of pipework to the different wheels. Unfortunately, I under-estimated the capacity of the pump and didn't put a big enough drain hole to return water to the feed tank, so eventually, the wheel chambers get flooded and stop the working of the wheels! One day...


The Engineer.

Sunday, 20 January 2013

Cylinder Boring...in a field...


At last years (2012) Great Dorset Steam Fair, this, most interesting display was seen. A railway preservation society (can't remember who) were demonstrating the re-boring of the cylinder on one of their locomotives (can't remember the locomotive either, but I think it was a 9F.) It was quite an impressive operation to be seen and showed some of the huge amount of work required to keep our industrial heritage in working order to the general public.

It was terribly boring. (And the "Pun of the Year" award goes to that!)


The Engineer.


Friday, 18 January 2013

"Engine-uity" (And the "Worst Pun of the Year Award" goes to that)

This is one we both love here at MBI, actually made by my granddad for filling the diesel tank on the van he keeps his fairground organ in.

Its a clever combination of household funnel, plumbing fittings, and that essential, invaluable material, string. The funnel can then be suspended from the curtain side clips and the tank filled easily from jerry cans!

Simples.


The Carpenter.

Thursday, 17 January 2013

HMS Incomprehensible Part II

Here is a further photo of HMS Incomprehensible, this time showing inside the engine room. As the project was built in the condensed time available to construct an A-Level project, I decided to use a Cheddar Models Pintail engine from my steam launch. I constructed the boiler based on the Cheddar models Pintail design but with an increase in the overall length. To get the two propellers to contra-rotate, I made a gearbox using Meccano gears, sprockets and chains and an Aluminium frame. The double chimney pipework is something I am rather pleased with - this was made from copper pipe fittings. I never really got around to finishing the engine room as planned - the fittings on the boiler were never finished, and as can be seen, little paintwork was ever done. One day...


The Engineer.

Wednesday, 16 January 2013

Where are they now? I "Confetti Cannon"

When a project comes to an end here at MBI we're never sad, because we always know that thats never the end of the story, oh no, eventually it will transform, like, well like a transformer, into something gloriously refreshing. And this new "Where are they now?" section of the blog will chart those changes!

The Confetti Cannon was a great example of this, too large and generally pointless to keep knocking about, when the time came when its materials could be harvested for another useful task, they quickly were. 

So I hear you cry, where is it now?! Well the cannon eventually became what can only be described as a cactus planter and mexican wrestling arena, to adorn my window sill! 

As seen below...


The Carpenter.

Tuesday, 15 January 2013

SHaaaaaaaWING Boat. Party time, Excellent.

One from the archives here, this was made for my GCSE in product design so is a good 3/4 years ago now. 

Essentially, the capacity was there in the given brief to make a juvenile sized fairground ride, and as you've probably gathered by now, I'm the sort of guy that when the time comes along that it seems appropriate to make a swing-boat, will sure as hell go ahead and do so. 

I'm fairly certain it was and forever will be the largest, and I'd argue most impressive, (our mutual friend the engineer may argue that) thing a student has ever produced at that school. And it got an A* so it couldn't have been bad!

I'll produce a "Where are they now!?" blog entry on this, as I can tell you now its all over the place!. Ultimately it was an exercise in constructing the thing, as i never really had any intention of keeping it. I've been told by a vast number of people since however that it was quite the waste and that they'd have happily had it for their gardens! 


The Carpenter.

Monday, 14 January 2013

HMS Incomprehensible

This was built for my AS Product Design practical section. It is based on the designs of the British battleships built around the 1880s and 90s. The hull is a crude, flat bottomed design made of plywood - it weighs a ton! The photo shown here is of the boat midway during construction where the hull framework has been completed, but little else. The bodywork and guns are simply card mock ups taken from the full scale card model built before construction. I will post further photo of the ship during construction and at completion.


The Engineer.

Friday, 11 January 2013

Something to Dampen Your Spirits... II

A Little further work to the replacement dampener for my Hawkes Ajax snare restoration.

The new felt pad with pivoting arm can be seen, along with a spring I made from one of our organ wind chest springs, this ensures the pad will sit level on the skin.

A block ensures the tensioning thread traverses the drum shell at a constant 90 degrees.

Quite pleased with this, it looks really cool even if I do say so myself, shame it will never be seem!! Still at MBI if a job is worth doing its worth overdoing

Thursday, 10 January 2013

Unusual Methods of Clamping V

I'm currently working on an Airfix model of HMS Iron Duke, the first step of which is the assembly of the hull - a job I always hate on Airfix. It involves the joining of two moulded hull sections together - although the fit of the components is usually pretty good, they don't always want to go together too well. My method is generally to align the components and glue either the bow or stern sections together (whichever is easiest to clamp), allow these areas to dry, then do the rest of the hull in one go, clamping together with the deck in place using elastic bands. I'm far from an expert Airfix builder, but that is the method that works for me! Might be of interest to someone!


The Engineer.

Monday, 7 January 2013

Raising Water by the Impellent Force of Fire - Savery Engine Model

I have always been fascinated by the technology used in the early days of the Industrial Revolution by pioneers such as Thomas Savery, Thomas Newcomen and James Watt and as with most other things I am interested in, I feel the best way to get a feel for the engineering work involved in something is to build a working model of said thing!

This model of Saverys 1698 pumping engine was built from odds and sods around the workshop. It is purely an experimental model to get an understanding of the problems involved in the production of such an engine. I plan at some stage in the future to build a more realistic looking model of the Savery pumping engine, set in a mine or pumping water to a fountain as one rich Duke in the late 17th or early 18th century did. I'll keep you posted!

By explaining the working principle of the Savery engine, I will be doing little more than repeating what I have read in books over the years - it's probably better for you to google it, there are some fantastic animations showing it's operation, but to start you off, here is a link to a Wikipedia entry on Thomas Savery.


The Engineer.

Sunday, 6 January 2013

Richard Trevithicks 'Catch Me Who Can?' Part III

A further update of the progress made on this project sees a trial assembly of the engine components into the frames. The engine is held roughly in place with a couple of bolts and some crudely shaped brass supports. These will need milling to a more attractive shape and the long bolt replaced with a proper spacer when some more time can be spared for the project. However, I wanted to see it going first, so, I just had to put the airline on it. As can be seen below...IT RUNS!


The Engineer.

Saturday, 5 January 2013

Hawkes & Sons - A Brief Historical Interlude,

Whenever we have a project here at MBI we always undertake a little research, if for no other reason we might learn something interesting, more often than not though you'll learn something useful that will stand you in good stead when working on the thing in question.

The Hawkes snare I've been working on for a while has been quite easy to learn a little about, although from what I've found it seems to be reasonably rare, I haven't found another exactly the same and only a handful similar.

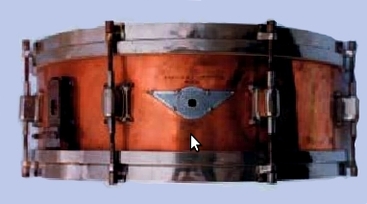
It was obvious from the badge that the drum is an "Ajax" model, a range I've learnt was launched in 1927. It also appears the company merged in 1930 to become Boosey And Hawkes. I'm unsure wether drums were branded still solely as Hawkes after this period (as mine is) but I would assume probably not. This leads me to believe that the date, hand written on the label inside, along with the serial number, are legitimate. The date reads 31/12/1928. The serial number also stamped on the shell is 8666

The exact model looks to be an Ajax Senior no. 2    


reference - http://ukdrums.weebly.com/hawkes--son-1900-30.html

Hawkes and Son were founded by Wiliam Henry Hawkes in 1865 and were rivals of Boosey & Co who they later merged with in instrument manufacture, instrument fittings manufacture, reed production  and music publishing. 

It seems then that this must be one of the earliest Ajax drums, a name which Boosey and Hawkes stuck with right the way through to the 70's. 

I'd love to know more information if anyone has any info do get in touch!

The drum is slowly being restored to playable condition, I might add not to original factory condition, to a playable and aesthetically pleasing condition. Reverting the drum to pristine factory condition would loose a considerable amount of history, and the changes I make to suit my wants will add to its history. It is a strong view of mine that "as original" restorations often only serve to make something less interesting, only serving to destroy years of accumulated history! 


reference - http://ukdrums.weebly.com/boosey--hawkes-history.html

The Carpenter

Thursday, 3 January 2013

Something to "Dampen" Your Spirit! I

Perhaps one of the more interesting tasks in the Hawkes Snare Drum Restoration is the skin dampener. This is the mechanism that pushes against the resenting skin to have a dampening effect to the sound. The one fitted to the drum when I purchased it was clearly not original and was somewhat poorly made, however as the mounting holes were present on the drum, and its a useful feature to have, I decided to make a replacement.


The original can be seen next to the beginnings of my remade arm above, the original is a steel tube with the various attachments badly soldered in place, and the pivots being simply bent nails! The original dampening pad, not seen here appeared to be an upholstery ornamental button from a sofa! 

My new dampener uses the original bracket, and tensioning thread so that it aligns with the pre drilled mounting holes. The arm is a piece of oak I cut to suit. The dampening pad will be newly made with suitable felt padding. 


Above the arm is shown in production, along with one of our new Japanese made chisels. To you or I they appear like mortise chisels but I'm told all of their chisels are like this! Either way, it performed wonderfully and i'm sure we'll buy more in the future!


The arm is shown fitted temporarily inside the drum, looking quite nice, I realised that the original design didn't actually allow the tensioning thread to pass through the shell at a constant 90 degrees, it pushed it at an angle as it was moved, I solved this issue by creating a second linkage in the mechanism. It now appears to work as intended and now needs the dampening pad fitting as well as a nice adjustment knob fitting to finish.  

The Carpenter

Delaminating Disaster?!?!

Theres nothing more disappointing than seeing something you glued together break apart, .... nothing, well maybe some things, but it sure is a bummer. Still 9 times out of 10 one has to realise that the reason you're having to use an adhesive is because the material sure as hell doesnt want to be put in that shape/orientation in the first place.

A lesson I learnt then when having a go at drum lamination, if at first it don't stick, add more glue and more clamps! I found the these things really have to be clamped up bloody tight, so theres no place for being soft and trying to be sympathetic to the wood, CLAMP IT UP! and things will go your way!


When cutting the bearing edge for my snare, I found a couple of places where the plies hadn't adhered well. (probably due to my experimental laying up process, wont be trying that again, see other post!)

Shown above The poor laminations revealed...

A hearty application of glue and some strong clamps soon resolves this issue! Problem solved! 

A decent laying up method should avoid this issue, but its always possible, still I found if it does happen the problem can always be solved.

The Carpenter.

Wednesday, 2 January 2013

Birthday bashing... for lack of a better drum based pun.

Almost 2 and a half years ago I stumbled upon quite the bargain, in the form of a Hawkes 1928 Ajax snare drum in need of a little work, I disassembled it almost as soon as I'd bought it ready for a comprehensive restoration, but lack of time saw the project set back and progress slowed.

To date I've produced a new lug tensioner and polished and lacquered the shell. Today however being my birthday meant I could give the project a much needed kick in terms of progress seeing some newly polished and restored lugs re fitted to the shell.

I'll post some new updates in the coming weeks as I intend to see this finally off of my manbench, as well as maybe some history of the drum and the company that built it.


The Carpenter

1 1/2" Scale Allchin 'Royal Chester'

Recently I picked up a substantially complete model of Royal Chester built to the famous W.J. Hughes design in 1 1/2" scale. To date most of the work has been completed - still needing completion are the engine components, boiler fittings, steering and various other miscellaneous tasks.

A set of drawings has been bought down with me to university, and the W.J. Hughes book has been ordered and I plan to be ready to commence work over the summer holiday period.


The Engineer.